

The Planck - Key Theory
Part 2, How I approached and adapted the layout of the Planck
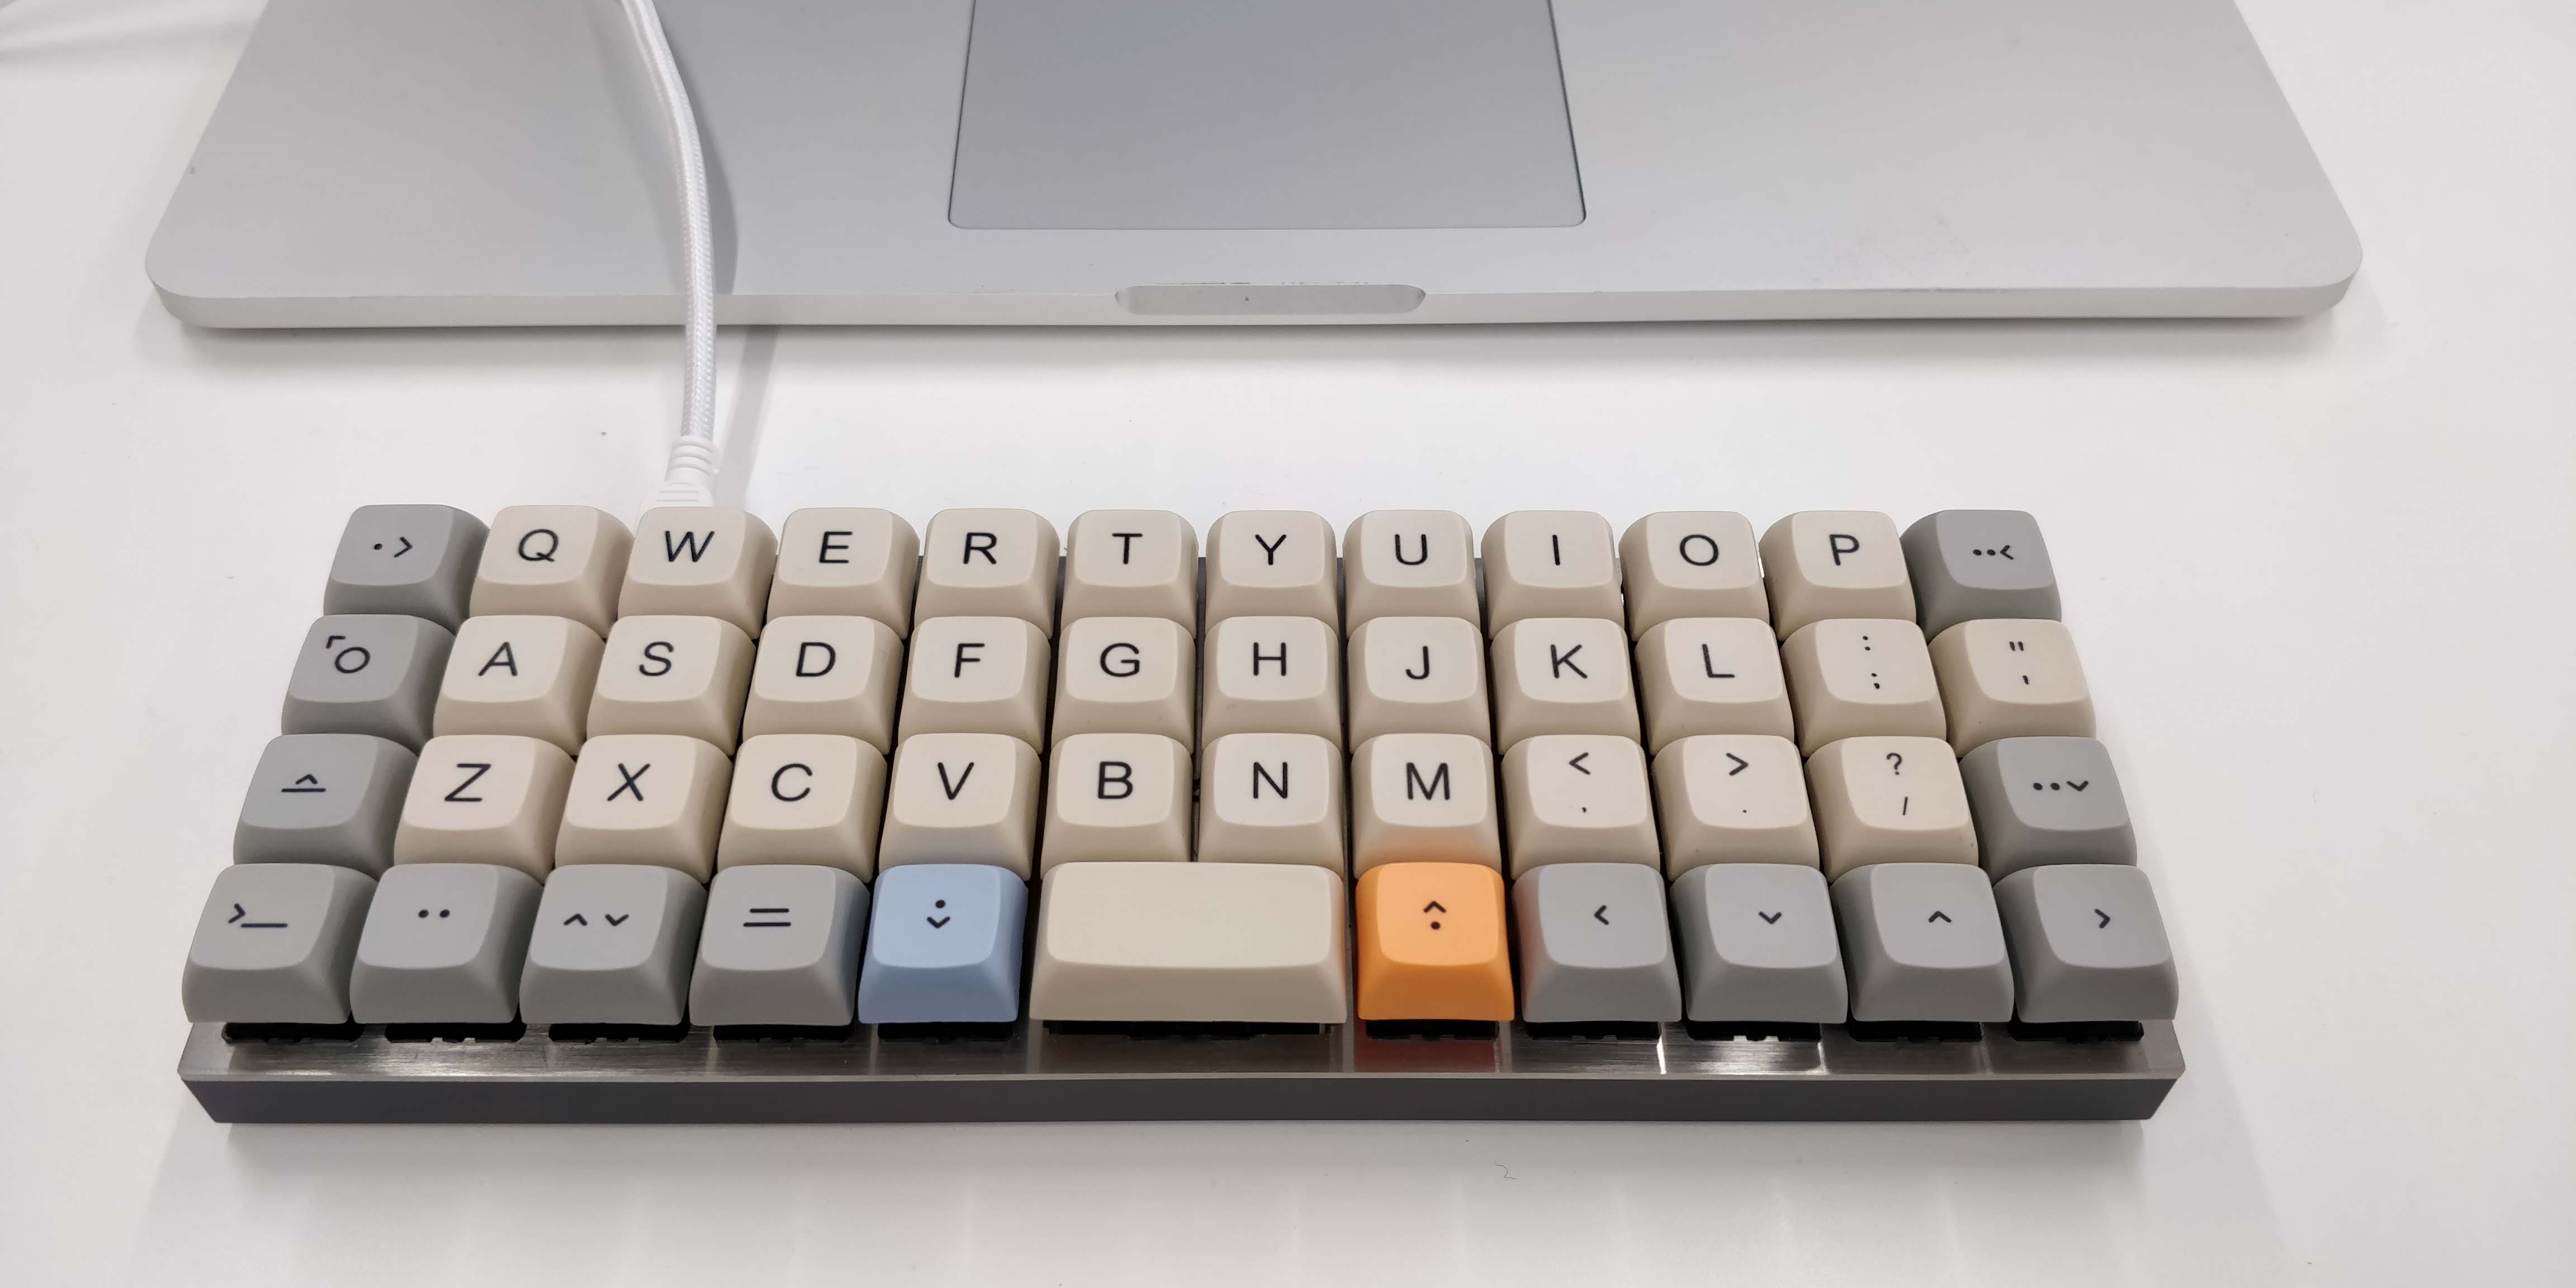
Part one of this two part series talked about the building of this Planck keyboard. It concluded by mentioning the full programmability aspect of one of these things, allowing you to customise every aspect of it. Every single key can be mapped to pretty much whatever you want whether it's the desire to set every key to the 'A' key, or creating a new function key/layer. Given this ability, it only makes sense to organise these layers in a sensible way! This post will explore the layers that I created and my thinking behind them.
The Planck comes stock with a few different layers: Lower, Raise, Base layer, and Adjust (Lower + Raise). It also comes stock with the ability to set the base layer to a variety of layouts such as QWERTY, Dvorak, Colemak, and Plover. However, I'm not counting these as layers as it effectively just modifies the base layer keys that you see below! Still cool though.
Base layer
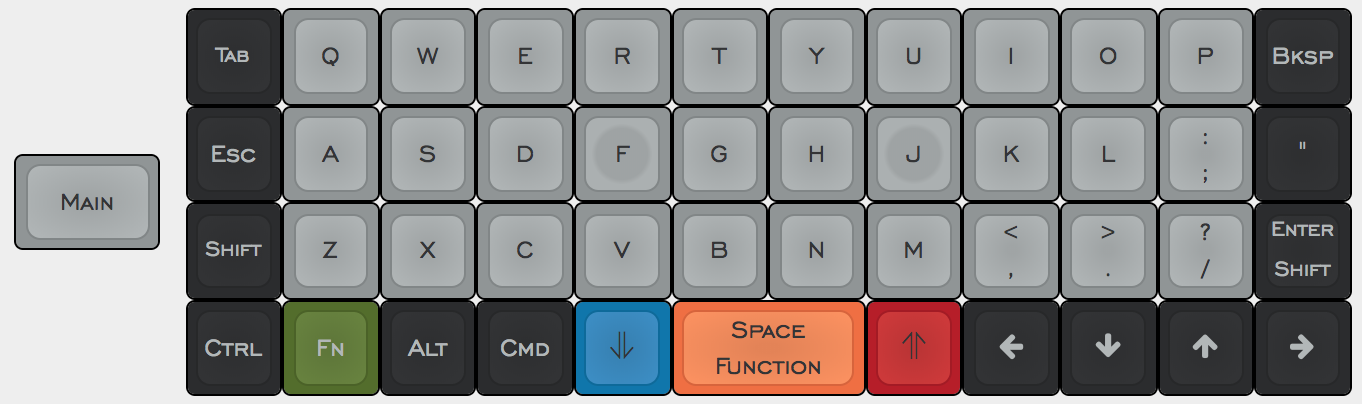
I didn't actually change the base layer much. As the development of the layers progressed, I saw a need to separate functionality a bit more and instead of having crowded Raise (red) and Lower (blue) layers, I introduced another function key 'FN' (green) as well as turning the spacebar into a function key (orange) when held. Turns out the space function created quite a nice user experience! We'll get to those later though.
A few other key considerations is that I swapped the position of 'CTRL' to be the left-most key as this is what I'm used to on other boards, and I also turned 'Enter' into 'Shift' when held. It turns out that I struggle to cope without right shift. I wasn't aware until I tried this keyboard out!
Lower ⇓
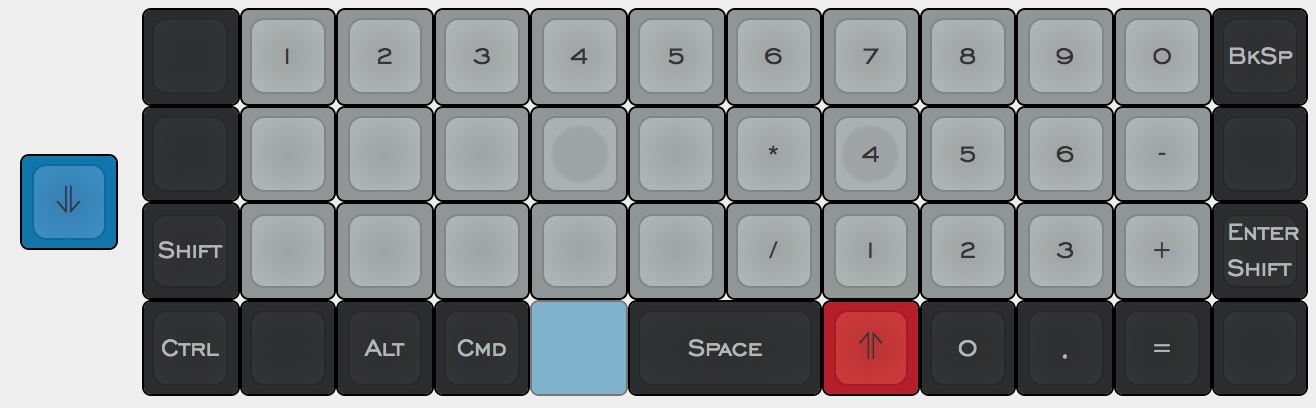
Numbers. Who doesn't love a bit of numbers? I previously mentioned that I wanted to group the functionality of similar keys. I basically wanted an entire layer dedicated to the numpad for doing calculations. I also added a shift key in there too in case for whatever reason I wanted to turn these numbers into symbols like you can with a normal keyboard by holding the shift key down. I doubt I'll ever use it but I had the real estate available.
Raise ⇑
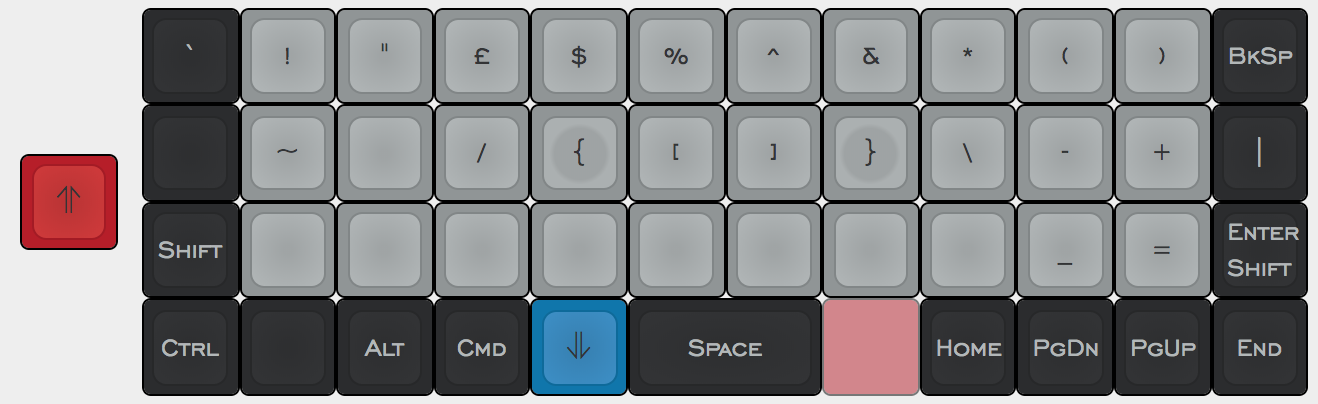
I'm a Software Engineer by trade, and as such I use a lot of symbols. The Raise layer contains all of the symbols that I'll need to be able to code . This is the layer that I arguably spent the most amount of time revising. It went through many iterations where all of the brackets were mainly grouped in the right corner but didn't work without making a funny claw shape with my hand. After trying it out for many weeks this just didn't work as well as I wanted to. I had to stop lying to myself that this layer that I'd spent ~6 months working on before the keyboard arrived wasn't absolute crap.
I decided to follow the Colemak pattern and moved these commonly used keys to the 'Home row'. The 'Home row' is the row of keys where your fingers naturally rest (the row containing 'F' and 'J' on QWERTY). By putting commonly used keys on this row it minimises the need to move your hands around as much. As it turns out, this works pretty well and is super comfortable to use. It took a little while to remember where I put everything, but once I did it felt very natural.
FN
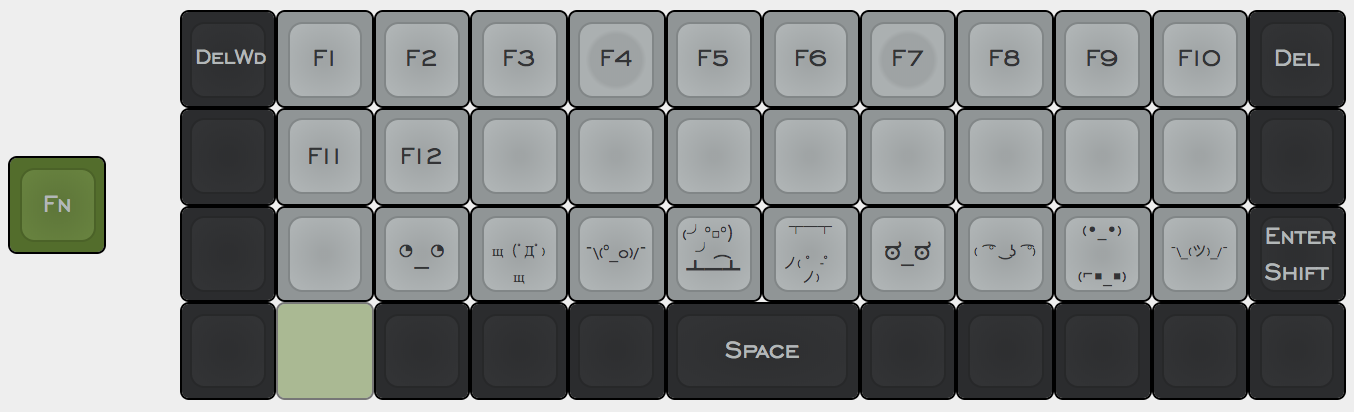
This additional FN layer was intended to be home to function keys and macros. I don't normally use the 'F1-12' keys so I moved them away from the common 'Raise' and 'Lower' layers and put them here. I also love ASCII art and use the faces that you see above quite often as responses to messages. It can sometimes be a chore to google, copy, and paste them. Why not put them on a layer of their own? This is still a work in progress and I haven't quite figured out how to program them into the keyboard, but this is my intention.
Space FN
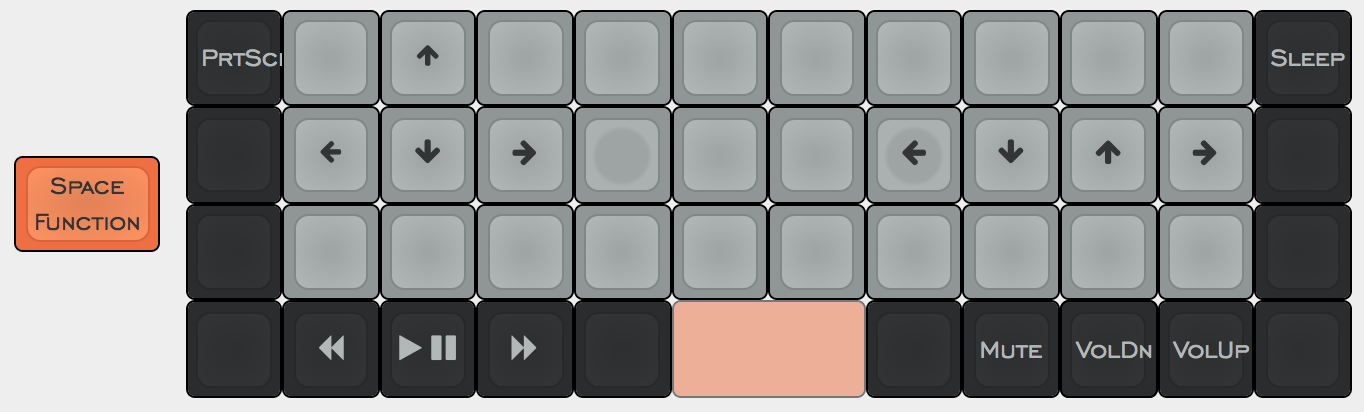
Aaaaaand everything else. I mentioned a few times that I didn't want to overcrowd the layers. The space layer became a bit of a navigation layer as sometimes it can be a bit of an effort to use the arrows keys on the base layer. Having two commonly placed sets of arrows ('WASD' and 'HJKL') equidistant to the spacebar makes for a very convenient and comfortable way to navigate around. I may move 'Page Up', 'Page Down', 'Home', and 'End' to this layer at some point but it's fine for now.
Adjust (⇑ ⇓)
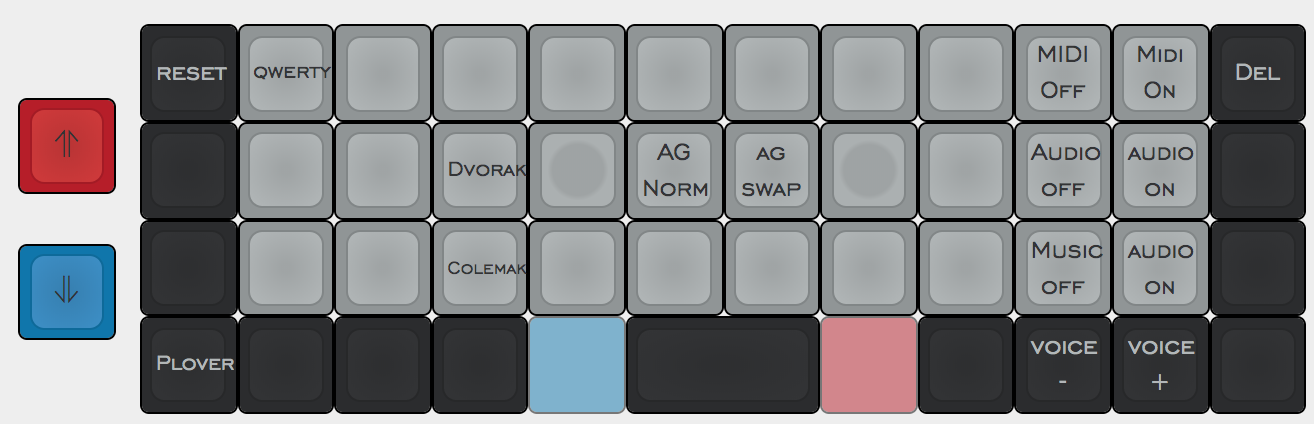
Finally the adjust layer contains keyboard settings and configurations. The default layout for this layer to me made absolutely no sense. There was no pattern or indication as to why the keys were in the positions they were, so I shuffled them. That's the beauty of this firmware!
The layout changers were placed on their initials key, so 'QWERTY' on 'Q', 'Colemak' on C, and 'Dvorak' on 'D'. I then grouped the on/off up/down keys on the right all following the same convention. This is the layer that I expect to be on the least but it's good to have it organised in case I require it.
The Technicals
"How do you even program the keyboard?" I hear you cry out. The firmware, QMK (Quantum Mechanical Keyboard), is written in C and allows you to use the defined key-codes to create your mappings.
Let's take the base layer for example:
    /* Qwerty
     * ,-----------------------------------------------------------------------------------.
     * | Tab  |   Q  |   W  |   E  |   R  |   T  |   Y  |   U  |   I  |   O  |   P  | Bksp |
     * |------+------+------+------+------+-------------+------+------+------+------+------|
     * | Esc  |   A  |   S  |   D  |   F  |   G  |   H  |   J  |   K  |   L  |   ;  |  "   |
     * |------+------+------+------+------+------|------+------+------+------+------+------|
     * | Shift|   Z  |   X  |   C  |   V  |   B  |   N  |   M  |   ,  |   .  |   /  |Enter |
     * |------+------+------+------+------+------+------+------+------+------+------+------|
     * | Ctrl |  FN  | Alt  | GUI  |Lower |    Space    |Raise | Left | Down |  Up  |Right |
     * `-----------------------------------------------------------------------------------'
     */
    [_QWERTY] = LAYOUT_planck_grid(
KC_TAB,  KC_Q,    KC_W,    KC_E,    KC_R,    KC_T,      KC_Y,      KC_U,    KC_I,    KC_O,    KC_P,    KC_BSPC,
KC_ESC,  KC_A,    KC_S,    KC_D,    KC_F,    KC_G,      KC_H,      KC_J,    KC_K,    KC_L,    KC_SCLN, KC_QUOT,
KC_LSFT, KC_Z,    KC_X,    KC_C,    KC_V,    KC_B,      KC_N,      KC_M,    KC_COMM, KC_DOT,  KC_SLSH, MT(MOD_LSFT, KC_ENT),
KC_LCTL, FN,      KC_LALT, KC_LGUI, LOWER,   SPACE_FN,  SPACE_FN,  RAISE,   KC_LEFT, KC_DOWN, KC_UP,   KC_RGHT
    ),
You can see that KC_TAB corresponds to the tab key, KC_ESC to escape and so forth. MT(MOD_LSFT, KC_ENT) for example is 'Mod-Tap'. I mentioned during the Base layer section that I turned 'Enter' (KC_ENT) into 'Shift' (MOD_LSFT) when held down and when tapped it acts as a normal Enter key. MT in this case allows me to do this. Full documentation on the keycodes available is accessible at the QMK github repository.
These mappings are then applied by running a simple command where 'smittey' is the name of my layout, 'rev5' is the PCB revision, and 'dfu' is the bootloader:
make planck/rev5:smittey:dfu
As I mentioned, these layers are a work in progress and are constantly being tweaked to work better for me. I doubt that they will change drastically but it's likely that in a few months my actual mappings won't reflect what's in this post. For now though this is a good record of V 1.0 of my Planck keyboard.
You can find my full mappings and source code on Github here, the above layout to edit and further improve on here, and if you have any comments or potential improvements (as I'm sure there are many) please do let me know in the comments below!


