

Why You Should Care About Web Performance
Techniques for optimising - Every 10th of a second counts
"Slow and steady wins the race"
~ Aesop's Fables
... except on the Internet in 2020.
What do we mean by 'performance' anyway?
Speed! Performance refers to the speed in which websites are downloaded and displayed in the user's browser.
A bit of a 101 for any non-technical readers but websites are made up of several parts: 'assets' like content, images, audio and videos, 'markup' which details the structure of the page, 'stylesheets' which add a bit of spice and make them look pretty, and also files that help the interactivity of the website such as javascript. There's a few more, but you get the picture. There's a lot that your browser has to download and all of this needs to happen before you can say the sentence 'why is my website so slow?'.
Why should I care?
Performance is about people. If you're involved with a website in any way whether it's because you're the sole developer or you're a product owner, you want to create a great experience for your users. What happens when you do this? Not only will your users be happy, but they will statistically come back! Return visitors means more conversions and sales.
Don't believe me? A study done by Akamai (the worlds leading Content Delivery Network) found that desktop pages that experienced a two-second delay – loading in 3.8 seconds instead of the optimal 1.8 seconds – had conversion rates that were almost 37% lower. And on mobile? These were even worse. Couple this with another part of the study that concluded that 53% of mobile site visitors will leave a page that takes longer than three seconds to load and it's scary for business. A one-second delay in load time could mean the difference of millions per year on a big eCommerce website that generates £100,000 per day. Sales aren't everything - you may just have a blog. But I'm sure you don't want users turning away from your hard work and content because of tenths of a second.
Another side effect of poor website performance is SEO (Search Engine Optimisation). What does this mean? Well not so long ago Google announced that it would be rolling out mobile-first ranking so if your website is slower, it'll be ranked lower!
Bottom line: Fast websites are king, user loyalty is rare, and it seems that life is too short to wait around.
Give your website a run for its money
By this point, I bet you're curious how your website matches up! Does it load before that magical 1.8 seconds? Are more than 53% fleeing before the page loads your amazing content?
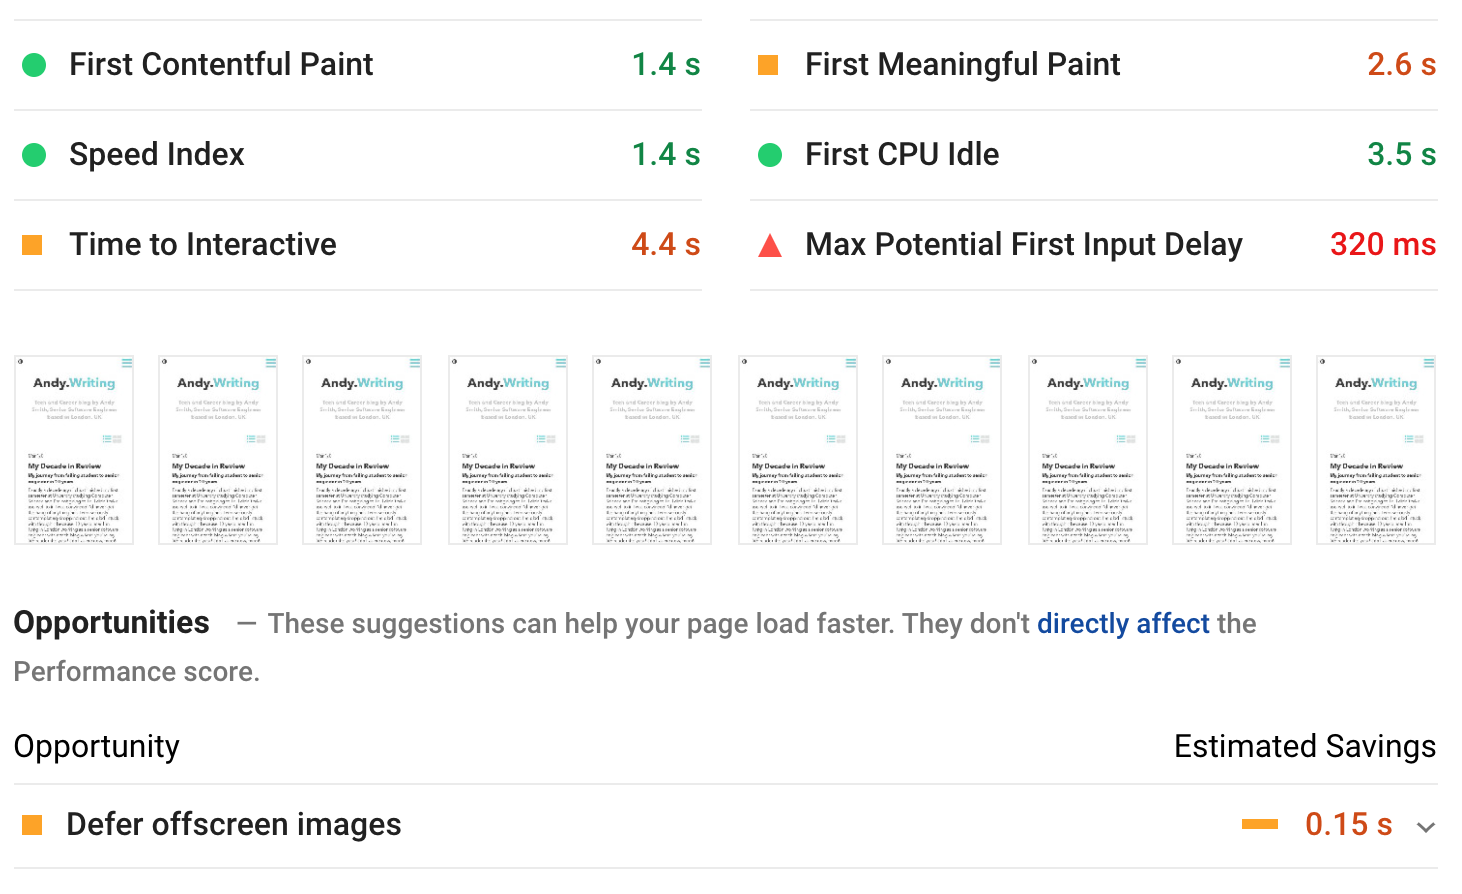
There are tonnes of tools out there you can use, but a favourite of mine is Google Insights. Google do a pretty good job at trying to make the Internet fast as possible (after all, why would they want to give you search results to slow sites?) and they offer this tool free of charge to analyze the content of your web page. In addition, it also generates suggestions on how to improve performance! Pretty neat stuff. This tool is also baked into Google Chrome Developer Tools which they called 'Lighthouse', accessible through the 'Audits' tab allowing you to run against any web page without needing to load the Insights Website separately.
As a demonstration, I inputted this blog into Google Insights luckily for this demonstration there are some improvements I can make. Go ahead and try it for yourself.
What causes poor performance?
Modern web development is very different from development 20 years ago no, 10 years ago no wait, 5 years ago erm, 1 year ago? - there we go.
Web development was once 'opt-in' when it comes to the developing, by which I mean that you generally started from the ground up. You had a blank canvas and required resources until it was finished. Today - frameworks and libraries exist which help with a lot of the heavy lifting that you had to implement yourself some years ago. The catch is this heavy lifting comes with a cost... This I refer to as 'opt-out' developing.
Running a production build without any optimisation especially when using a framework that provides a bootstrapped project starter like create-react-app will generally bundle a lot of stuff. It will be minimal but that bundle to produce 'hello world' can still be 300kb.
Supermassive websites like Amazon that contain a lot of images, content, and features loads in 1.1 seconds. That's crazy! How? it all boils down to tuning the performance by stripping it down to only the things you need to load as well as that all-important first render of the web page. As mentioned above - every tenth of a second counts subconsciously to the user.
Common causes and cures
Each of these points deserves a separate post and some of them require a lot more attention and time than others, but they're things you should be aware of.
- Image Optimisation
- Bundle size
- Caching
- Preempt and preload
- CDNs
- Remove your render blocks
- Static vs dynamic
Image optimisation
This is typically is a huge contributing factor to slower web rendering, so I'm going to go into it a bit more than other sections.
Images can easily be huge. If you're creating your images for your website then the chances are they're going to be high resolution already. If not and you shamefully display images from popular image library sites like Unsplash as if they're your own like I do; analysis of 10 random images shows the average size to be 1.6mb. Consider you have an image spacing out content every few paragraphs and perhaps a hero-like graphic then you could easily see your page exceed 5mb. I know that data is fairly cheap now but that's insane and will also take the user longer to download and display!
Don't believe me about the impact? I recently redesigned this whole blog from scratch, but this time with image optimisation. It took my average blog post down from 3mb to 200kb.
By this point, I can feel you doing a 1000-yard stare as realise that your website is a data-hungry monster and I can hear you scream "GOOD LORD WHAT CAN DO?!"
1st step: Choose the right format
Arguably one of the more not-so-transparent steps is choosing the correct file format. This can be quite confusing and sometimes when saving an image in photoshop for example I just use to randomly choose whatever took my fancy at that moment, which was more often than not png.
It should be noted that there isn't anything wrong with using a png, it's often seen as a much more attractive alternative to the gif format, and they don't degrade over time with every save like a jpg does (I'm sure you've seen the meme "needs more jpg" where the image has basically been reduced to a mosaic).
-
GIFs - Use for small and simple graphics like icons, thumbnails and decorative images (they aren't just used for animations). When used for bigger images the file size will be way bigger than it needs to be compared to other formats.
-
JPEGs - They will be best suited in the vast majority of cases on your website. For normal product images, for example, you'll get the best quality for the smallest size in kb.
-
PNGs - This guy is a good alternative to GIFs and JPEGs but depending on the encoding can produce images with higher quality and also size. Because of this, maks sure that you know you're saving a PNG-8 or a PNG-24. The latter can be 3 times bigger... As a rule of thumb, choose PNG if the image has large flat areas of colour such as sky. They also provide good support for things like transparent backgrounds which can be useful.
-
SVGs - These should be used for simple graphics that are scalable. They're good for responsive design!
-
Others: WEBP, HEIC - These are new-age image formats backed by Google and Apple respectively and are hailed to be efficient and lighter-weight than the rivals above. They're definitely something to look into however there is a lacking of universal support for them and a lot of browsers don't recognise them fully. As a result, I'd just stick to what we know until those problems get ironed out.
2nd step: Reduce the size
The next thing you can do in your heroic efforts to make your web pages lighter and therefore more accessible is to reduce the size of your images.
It is recommended that for graphics within the main content of the page should be no more than 1500px for horizontal images, and 1000px for vertical. With smaller images comes a slightly smaller resolution but to the naked eye you won't see that at all, and I'll show you in the next section on 'resolution'.
For images that will fill a container like a hero graphic that it should be no more than 2400x1600px.
Note, just setting width="2400" height="1600" on your HTML <img/> element will not cut it. It might appear smaller on the page but the same amount of bytes will still be downloaded by the user.
3rd step: Compress your images
Your images can probably be compressed. Simply put, your images will contain repeating patterns and data. An easy example of this is a cartoon picture with grass all of the same colour. When compressed these repeating patterns and colours are identified and data references are made. This stops every pixel needing to have data individually stored for it. Less data = smaller size. There is a lot more science involved than that obviously, but the chances are you aren't reading this blog post to implement a compression algorithm. Just know that images can contain lots of data, and unless the image has 100% unique pixels (it probably doesn't) then the size can be reduced.
A good website for this is compressor.io. What I love about this is that it allows you to upload your image and using a slider it demonstrates that the quality loss is indistinguishable, yet the file size drops dramatically.
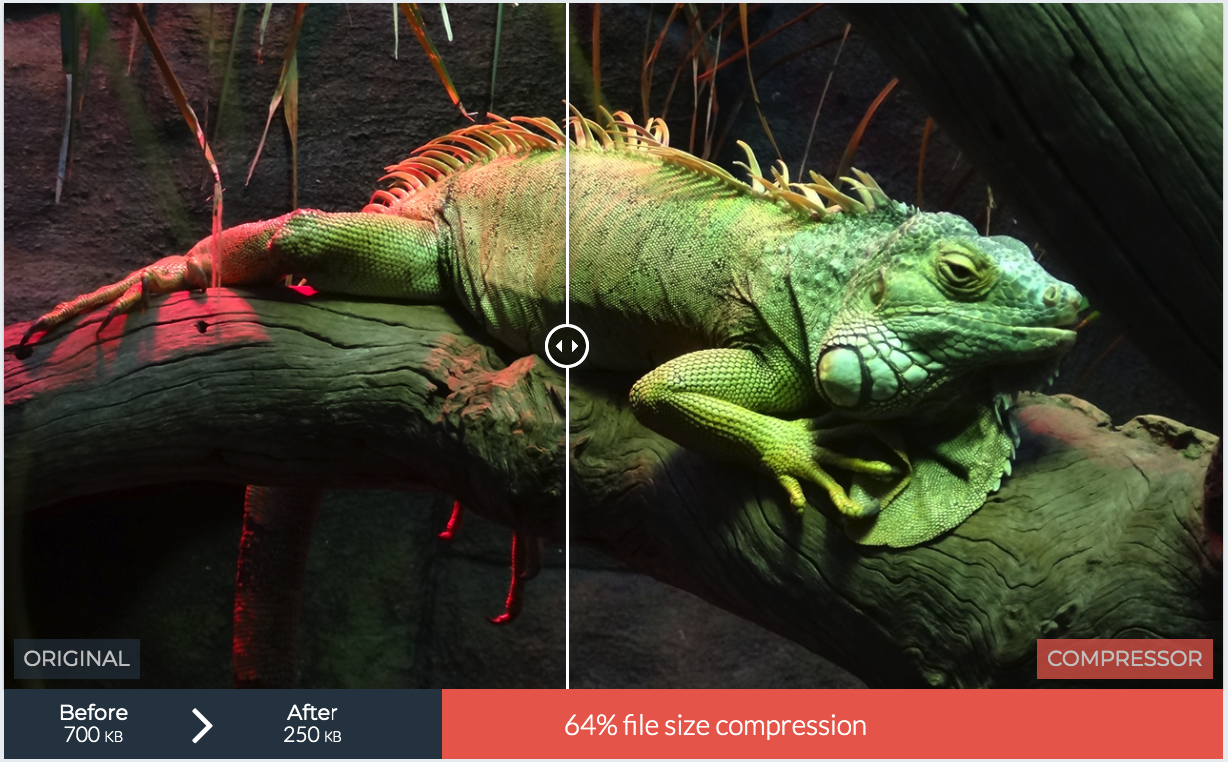
There are some important differences to note, such as lossy compression vs lossless but I think that's slightly getting out of the scope of this article. It's worth a look into so that you know you're choosing the right option, but for images on the web, in most cases I just use lossy.
Some other useful websites for image compression:
4th step: Look to prodive alternate sizing for your images
If you have the freedom to choose which underlying web technology or are looking to start a new website; if optimisation is a priority then look into GatsbyJS. GatsbyJS provides the capability to scale-up images to the optimal size for each device size and screen resolution. This means that if the image sits in a smaller container, the file size will be smaller and therefore quicker to load. Gatsby isn't the only technology that does this but it does it well and a demonstration that this technique is possible.
Be more humble about the size of your Bundle
Your bundles are in most cases the Javascript and CSS files that are sent from the server to the user. If you are using an existing framework to develop on (such as create-react-app) then there will already be some sort of a way to bundle all of your files together. The bundle they spit out will consist of the dependencies required by the framework as well as any dependencies that you've decided to use along the way. If however, you've decided to build your project from the ground up, then you're also going to want to implement your own way to bundle the code.
Some common technologies to do this are the likes of Webpack, Rollup.js and Parcel. There are more, and each comes with their own set of features and unique selling points, but at their core they all allow you to do one thing: Make your stuff smaller! There are things that you should make sure are configured and/or enabled to ensure that you're reducing the size of your bundle as much as possible, so make sure your production configuration contains the following things.
Make your code ugly!
If you've ever inspected source code before and noticed that it looks like gibberish such as function ze(n,f,g,r,ws) {..} etc... followed by the thought "How the hell did anybody write this?" (like I used to) then it's because the code has been 'minified' - or sometimes called 'uglified'. This is the process of stripping out unnecessary white space, comments, shortening function and variable names, removing unused code, combining files, and even optimising code to make the file smaller (and therefore lighter) and quicker to download.
Tools that I'd recommend:
Command-line tool Uglifyjs - also used by Rollup.js under the hood.
Online website for CSS and JS minification - Minifier
Shake those trees
Tree shaking is the process of removing dead code. To take the name and extend the metaphor, imagine that your project is a big sturdy tree with lots of features (represented by branches and leaves. Maybe a bird or two if you're Twitter). Just like a real tree with dead leaves, your codebase could include old and disused code and packages that aren't used at all and contribute nothing to the tree anymore. They need to be removed by grabbing the tree and giving it a good old shake to let the dead stuff drop off. This works for your own code as well as libraries.
Under the surface, this works by examining all of the functions that are explicitly made available through the use of the keyword export and examining if they're actually used anywhere. If they aren't, then they won't be included in the final bundle. It's as simple as that! Your bundler should be configured carefully, however, to ensure that it's correct for your project and that it isn't being skipped for your modules.
Split it up
Code-splitting can be really useful is your project is huge! In a majority of cases, a single bundle is going to be produced and will include the routes, custom code, and dependencies.
Imagine, for example, that your website has 100 different pages and you know there's a good chance that your users will just interact with a small percentage of them at a time. It would make sense to split the bundle into smaller parts and just load for what is needed for that page, right? These can be loaded on-demand or in parallel and if used correctly the impact on performance can be huge.
There are several different approaches to code-splitting, each with their own use cases and benefits.
Vendor splitting
-
What? - This will split out the code of the vendor such as React and your application code.
-
When? - Ideally, this should happen in 100% of apps that utilise the code of other vendors as a framework or library to build their own app.
-
Why? - A change to your own app or vendor code will change the bundle resulting in invalidating the cache and causing a redownload of the bundle from the server. Typically your own code will change a lot more than updating dependencies and so splitting will decrease the cache misses down from 100% if one character changes anywhere.
Entry point splitting
-
What? - This will analyse the apps dependency tree where your routes, assets and functionality branch from.
-
When? - If your application is not a single page application or where the routing is not consistent. Additionally, if the entry points share the same vendor code causing duplication.
-
Why? - Some applications have multiple points of entry and this would de-duplicate code in the bundle. Splitting by entry point could result in quicker loading time.
Dynamic splitting
-
What? - This can split your code into small chunks to be loaded on-demand only when it's needed.
-
When? - This is best suited for 'Single Page Applications' (SPAs).
-
Why? - For less architecturally complex applications like SPAs only loading small bundles when necessary could have a big impact on load time.
Don't be greedy, only import what you need
This is more of a general good practise tip that isn't specific to front-end but will impact the performance due to bundle size. Don't import everything!
Where possible, only import the functions from the library that you are using in your file or component.
import { button } from "uiLib";This seems simple enough but it's very easy to import a whole module with the intention of refactoring it later and then forgetting. It could also get included in your bundle and unnecessarily increasing the size.

Cache your stuff!
The concept of caching is simple. Let's say you have a bowl of crisps next to you on your desk. Reaching for a handful from the bowl that is right next to you is easy, right? This bowl represents the cache and the crisps are your assets. Now let us imagine that we have no bowl, and every time you want a crisp you have to go into the kitchen and retrieve one from the cupboard. This action represents a network call. It's further, more effort, it takes more time, and lessens the experience.
So how does it work?
When the browser loads a resource it will look for the caching policy that was set via the Cache-Control HTTP header. At a very high level there are a few main parts:
-
Cache-Controlheader defines who caches the response, when, and for the length of time. This may be used by both the requests by the client as well as the replies of the server. -
Pragmais the legacy HTTP/1.0 implementation ofCache-Control. It's good to set this for older clients that don't support HTTP 1.1 and above (such as IE5 or Netscape 4.7 - yes, they're still out there lurking) but note that some CDNs ignore it. An important distinction is that this applies only to the requests by the client. -
There are other caching headers that are good to know about albeit less relevant such as
ExpiresandETagvalidation but the majority of what you'll need caching for can be accomplished with the above.
An example:
response.setHeader("Cache-Control", "no-cache, no-store, must-revalidate"); // HTTP 1.1.
response.setHeader("Pragma", "no-cache"); // HTTP 1.0.
response.setHeader("Expires", "0"); // Proxies.
Can I cache everything?
Yes, but you probably don't want to. Generally speaking, you only want to cache things that don't change too much and are predictable. For example:
- API calls
- Expensive computations
- Style sheets and general Javascript files
- Downloadable content
- Brand images
You should never cache:
- Sensitive information such as bank details, social security numbers (if you're dealing with the US) etc...
- Content that is prone to change
There are more, but you get the picture. I mentioned that you probably don't want to cache everything, which is very different from shouldn't. As with most increases in complexity to an application, it makes it more complicated. This means that debugging issues can become more difficult so as a golden rule:
Only cache if you need to. Evaluate each case and make a judgement about caching your assets.
What are the benefits again?
To recap, when used correctly caching will boose the performance of your site. It will:
-
Require less time to acquire the resources to render the page for the user
-
Lessen the load on your servers for returning users as they don't need to download the assets again
-
Decreased computation power by clients by storing results
-
Allow your website to be available even during a network outage and down-time
Preemptively load your resources
Prefetching, prerendering, preloading and preconnecting are great methods of boosting the performance of the website.
It's a way of telling the browser that at some point the user will need a range of resources, so load them in the background and store them in the cache. That way, when the user clicks on a link, for example, everything is already loaded by the browser.
This is like knowing you're going to need to eat around 6pm but waiting until you feel hungry to start cooking instead of preempting the hunger, preparing and cooking earlier on! Why make your users wait longer than they have to, too?
Like almost all other sections in this article, there are several different pre-fetching techniques that you can use.
DNS prefetching
DNS prefetching is defining a resource (normally in the <head> of the page) that will be required later in the user journey. This preemptively lets the browser know that we'll need resources from a particular URL. An example of this is being redirected after the confirmation page of a checkout that may be sitting on a different domain. Resolving the DNS lookup to this location will mean a quicker load when it does happen.
<link rel="dns-prefetch" href="//andysmith.me">Prefetching
Prefetching, unlike DNS prefetching, defines a resource or asset required in the future and will download it in the background. This could be a script, image or something else. An example of this could be downloading a font or image. It's important to note that this request can be abandoned by slow networks.
<link rel="prefetch" href="some-asset.jpg">Preconnect
Preconnect is a method similar to DNS prefetching except it also makes a TCP handshake for secure domains. Handshakes happen by communicating back and forth exchanging messages of acknowledgement, verification and encryption algorithms. Finally, a key will be calculated and used. This is obviously necessary but somewhat costly. It doesn't take minutes, more like mere milliseconds but it contributes to the load time.
With preconnect this will happen in the background for defined resources linked on the page and a secure socket will be opened ready.
<link rel="preconnect" href="https://andysmith.me/login">Prerendering
Prerendering is a technique used to define a resource that will be required in the user journey but an important distinction is that it will start to load the assets too. This sounds amazing, and why shouldn't you do this for all links on your page? This has bandwidth, network and client processing power implications, so only use this if you're absolutely sure that the user will need it. An example of this is a search engine being pretty sure that you're going to want the link at the top of the results page.
<link rel="prerender" href="andysmith.me">Once again, these sound like amazing ideas, and they are! But like all other considerations as a developer, understand the implications, pros and cons of each approach and implement with care and consideration to your end-users.

Utilise CDNs
Content Delivery Networks (referred to commonly as CDNs) provide a faster way of delivering files to your user.
They work by providing a network of servers that are distributed all over the world and will choose the edge server closest to the user to transfer the resource.
To keep on using our food examples, imagine that you live by a series of smaller supermarkets which all sell the same crisps. Much further away a bigger supermarket sells the same crisps. Which would you rather go to? You'd choose the one closest to you. Why? Because it's much faster and less annoying. Although data gets transferred fast, there is still a slight delay when considering geography so the closer you are to the resource the faster you'll get it.
CDNs can store almost any type of content but common usages include fonts, javascript libraries such as bootstrap or jQuery and stylesheets. Some well-known examples of CDNs are Cloudflare, Akamai, Amazon CloudFront, Fastly and more.
How do they work?
They work by doing the following:
-
When the user requests a resource for the very first time, it is downloaded from the origin server potentially far, far away
-
The CDN will cache this resource
-
If a user requests the same resource then the edge server will deliver it instead of the origin
CDNs provide many benefits that will contribute to speed such as reducing bandwidth consumption, protecting against DDoS attacks, handling high traffic loads, load balancing and tons more which are out of the scope of this article. Go and have a read!
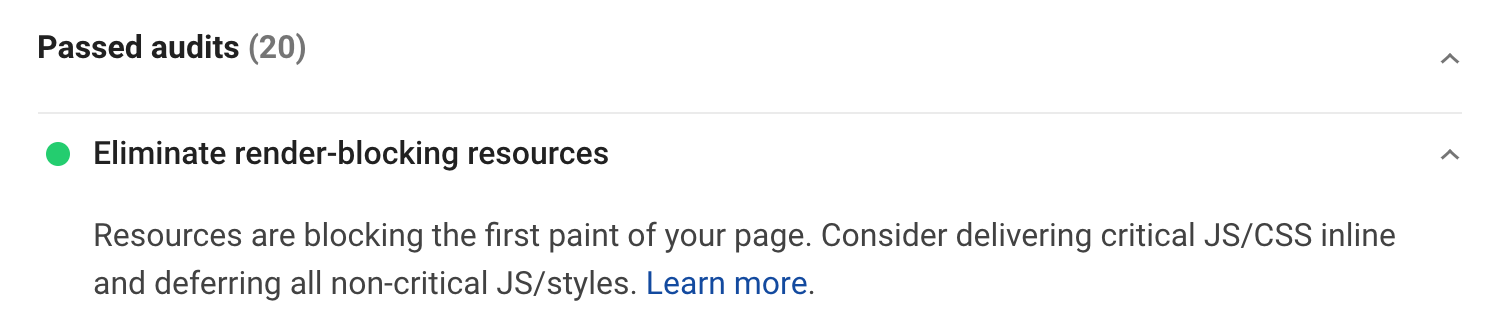
Remove your render blocks
Render blocking resources are a huge contributor to poor website performance. What this term refers to is the resources that are required to load before your website is visible in the browser.
When your website loads, it will send out calls to every script in the queue until the queue is empty. Most of the time, these scripts aren't necessary to the instant useability of the website and absolutely no user experience would be compromised by deferring the loading of these scripts.
In most cases, the culprits of render-blocking will be javascript and CSS files.
As a general rule of thumb, unless the resources don't affect what the user sees straight away (sometimes called 'above the fold' elements) on page load, then they can be deferred.
AHHH! help?
This is more tricky to diagnose, and unless you have a great understanding of all of the resources on your page and what they affect, then you may need some assistance. Plugged for the 3rd time in this article, Google Insights to the rescue!
With a bit of luck, the feedback should look like this. However, if it doesn't it will give some indication on the resources that you need to look at deferring.
I've identified the scripts, what next?
For any Javascript that's very important to your web page, the first thing you should consider if inlining them in your HTML. For everything non-critical, you should consider making them as async or defer.
<script async src="nice-to-have.js"></script>
<script defer src="further-down-the-page.js"></script>
For CSS you should look to split it up into smaller files and adding the media attribute. Every CSS file will contribute to delaying the load of the page so identifying which ones aren't needed after splitting them up can be good. An example of this is stylesheets dedicated to printing. The browser will detect this and know it is not required right away.
<link href="print.css" rel="stylesheet" media="print">Static vs dynamic
Depending on the purpose of your website and indeed how far through the process you are, it's worthwhile considering if it is best suited as a static or a dynamic website.
What do I mean by this? Well, a static website is one that is only client-side HTML, CSS and Javascript, whereas dynamic websites can be changed through code that is run in the browser and/or server. Generally speaking, static websites are quick. This is because they display the same content to every user and don't rely on databases driving the content.
There are lots of static site generators out there which allow you to write your website dynamically but will produce a static website.
Some examples of this are Gatsby for React apps (built on Javascript), Jekyll which uses templating and markup built on Ruby, and many more.

Conclusion
A poor performing website will lose you users, money, search result ranking and harder hit servers. A website that doesn't load quickly will give the impression of a poorer quality application or product and lessen the user experience.
This article contained a good amount of performance tips and techniques, but don't drive them away with love by implementing everything without thought with the hope that it will just work. Consider the circumstance and need, understand the pros and cons of the approach, and continue to check up on and monitor the performance through analytics and insights.
Performance is all about people. Keep your users happy by providing them with what the need, fast, and with good user experience and it'll more likely result in returns.


